Brazilian seafood soup

by Anna on January 6, 2011

in Seafood,Shelfish,Soups,World Food

Hello girls, aaaand occasional guys…. Happy New Year. Did you all have tons of fun this holidays? I hope you did. I went away for a much needed retreat vacation, such beautiful breath-taking place. Surrounded by mountains and citrus farms. Wow…it was really amazing. It was a retreat so there was no TV but my hubby and I are die hard addicted to technology so we still managed to watch some programs on Hulu in my computer. It was an “Avec Eric” marathon. Have you seen his videos? If not… go to Hulu and type Avec Eric and watch the 2 seasons, it is amaaaaazing, he is lovely and a genius, I love him and hubby right now is really into cooking so he enjoyed it too. There are no New Year resolutions in this household that’s really lame already…I think we have to be good to ourselves all year around. So with that in mind I made this delicious Brazilian seafood soup, the ingredients are more like Italian but anywho…it’s really yummy.

Brazilian seafood soup

Ingredients:

  • 1 big fennel bulb or 2 small thinly sliced
  • 3 shallots sliced divided
  • 3 cloves of garlic minced
  • 1 can of San Marzano tomatoes diced
  • 1 teaspoon red chili flakes
  • 1 cup of white wine
  • 1 teaspoon of old bay seasoning
  • 1 can of coconut milk
  • 1pound of little neck clams
  • 1 pound of mussels
  • ½ pound of jumbo shrimp
  • Parsley
  • 3 cups of chicken or vegetal broth
  • Season with salt and pepper to taste

For the anchovies toast:

  • 1 baguette
  • 2 tablespoon of butter
  • 2 Anchovies filets

Direction:

First start sautéing the fennel and half of the shallots, salt and pepper in a median low heat to develop the flavors, then add the old bay and red chili flakes. When the fennel and shallots are soft add the diced tomatoes (in winter is best to use good tomatoes from can) I love the San Marzano. Let the sauce reduce until is a thick consistency.

Meanwhile clean all the clams and mussels and de- vein the shrimp. Then I used the immersion blender to make a smooth and creamy sauce. After that add the chicken broth and let it simmer for 20 minutes.

In another pan melt 2 tablespoons of butter and sauté 2 anchovies filets mixing constantly to dissolve the anchovies. Don’t worry once the anchovies melt they just have a nutty taste not fishy. Fry the slices of bread until they are golden. Set then a side. Those toasts are delicious with soup. In the same pan add the rest of the shallots and the wine let it reduce a bit. Add the shrimp and sauté it until they get pink then add the little neck clams and the mussels and cover with a lid until they are all open. (Discard the ones that didn’t open, they are not good). Pour the coconut milk and the tomato/chicken broth mix. Sprinkle with parsley and serve.

{ 24 comments }

This post should be dedicated to Rouxbe. Because since I started the course I’m eating pretty awesome restaurant quality food. I realized that I knew nothing as soon I started my first lesson. I’ve learned how to make a proper chicken, beef and vegetable broth. How to make delicious sauces, how to choose meat and fish correctly ( boy…I really didn’t now how to choose them). Heat temperature, how to make amazing omelets, and anything else with eggs, wow… I have been trying every single lesson. But the most mind blowing lesson for me was the brine lesson. First I tried it with chicken breasts, and you know how chicken breasts can be pretty boring sometimes, right?

So I bought skinless chicken breast and made the brine, let it do its magic and then using the dry heat cooking method I pan-fried it. OMG! It was the most delicious chicken breast I ever had. I’m not kidding… It was juicy, flavorful, amazing. I’ll never cook chicken breast without brine again. I know…. you must be thinking I’m making this big advertise for Rouxbe because I will get money if you do the membership right? So please don’t even use my name or my site for your membership. But just do it, at least try the free videos, you will not regret. Even my husband now started to watch the videos we watch together at night and test the recipes at weekends. This recipe today is another delicious chicken from the site. I hope you enjoy.

Maple and mustard glazed roasted vegetables

  • 2 pounds roots vegetables of your choice
  • 4 tablespoons olive oil
  • ¼ cup maple syrup
  • 2 tablespoons mustard
  • Salt and freshly grounded black pepper
  • Red chili flakes (optional)

Mix well the maple syrup, olive oil, mustard, salt and pepper. Pre-heat the oven to 350F. I used here black radishes, watermelon radishes, purple carrots, blue potatoes and baby fennel. I wanted to have a very colorful plate. Wash the vegetables and roughly cut them. Toss the vegetables with the maple mixture. And roast it until vegetables are soft and golden.

Roasted Chicken

  • 1 whole chicken

For the Brine:

  • 1-cup water
  • 2 tbsp table salt (or 30 grams of any other salt)
  • 1 tbsp granulated sugar
  • 1 clove garlic
  • 1 to 2 tsp juniper berries (optional)
  • 1 tsp black peppercorns (or white)
  • 1 bay leaf
  • 5 to 6 stems fresh thyme
  • 3 cups COLD water (or ice water)

To prepare the brine, place one cup of water into a small pot and bring to a simmer. Add the salt and sugar and stir to dissolve. Smash the whole clove of garlic and add it to the pot. Press the juniper berries to release their aroma. Add the berries, peppercorns, bay leaves and thyme and bring the mixture to a gentle boil. Turn off the heat, cover with a lid and let steep for about 20-30 minutes. Before using the brine, add the 3 remaining cups of cold water (including ice, if needed). For food safety, the brine must be very cold before the meat can be added. Depending on the amount of meat you are brining, you will likely have to multiply this recipe.

Choose a suitable-sized container and prepare enough to fully cover the chicken. Remove the neck and the insides from the chicken and place it into the container. Pour the cold brine over top (add cold water to fully cover the chicken) and place into the refrigerator for 6 hours or overnight (the longer the better). When ready to roast the chicken, remove it from the brine and let drain. Pat dry with paper towels (inside and out). To cook the chicken, first preheat your oven to 400º degrees Fahrenheit (200°C). Next, butterfly the chicken. Press down the chicken to ensure it lies flat. Using your fingers, loosen the membrane and skin under the breasts, thighs and drumsticks. Be careful not to tear the skin. Place a slice of your compound butter or regular butter under each breast, thigh and drumstick. Spread the butter underneath the skin as you go. Set the chickens onto a baking tray. Drizzle with a bit of olive oil and rub all over the skin. Season with salt and pepper. If you decide not to brine the chicken, you may want to season a bit more liberally. Place into the oven for about 20 minutes. Then turn the heat down to 350º Fahrenheit and let cook for another 30 minutes or so. Baste chicken parts way through with the drippings from the bottom of the pan. To check for doneness, flip over and cut off a thigh. Make an incision in the thickest part of the thigh to peek inside. Once done, carve and transfer to a platter. If desired, drizzle with a reduced dark chicken stock and serve.

For the Compound Butter:

  • 1/2 lb unsalted butter (1 cup or 2 sticks)
  • 1 small shallot
  • 1 small bunch chives
  • 1-2 tbsp fresh tarragon
  • Salt (to taste)
  • Freshly ground pepper (to taste)

To make compound butter, the butter shouldn’t be very soft; otherwise it is too hard to shape. If it is really cold, cut the butter into small cubes and let it warm up a bit at room temperature. Place the butter into a small bowl and blend with a wooden spoon just until smooth. Set aside. Finely mince the shallots, chives, and tarragon and place into the bowl. Season well with salt and pepper. Stir gently to evenly combine.

{ 28 comments }

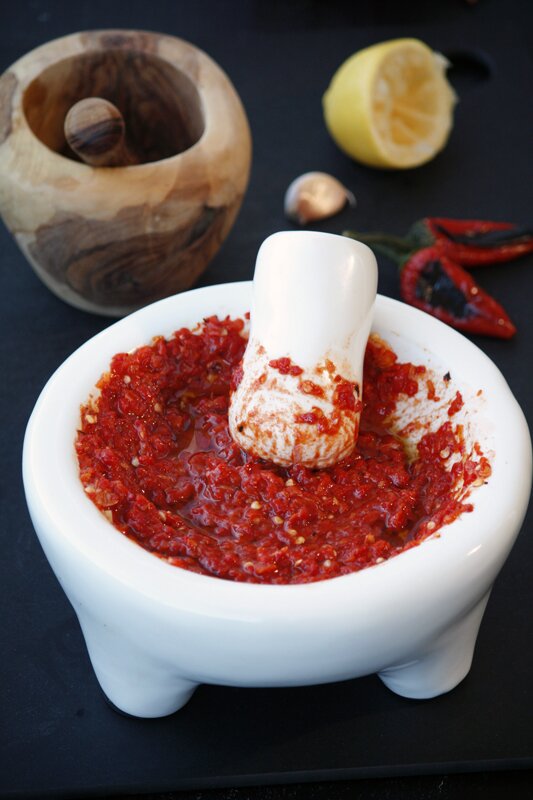
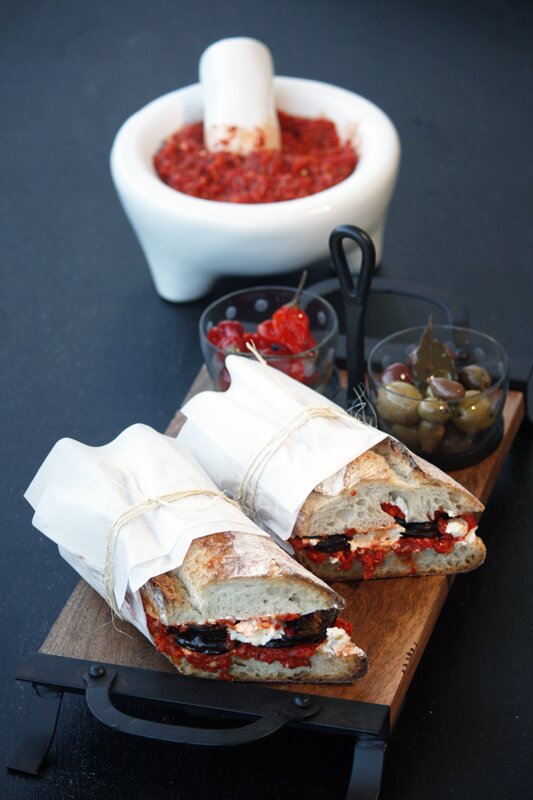
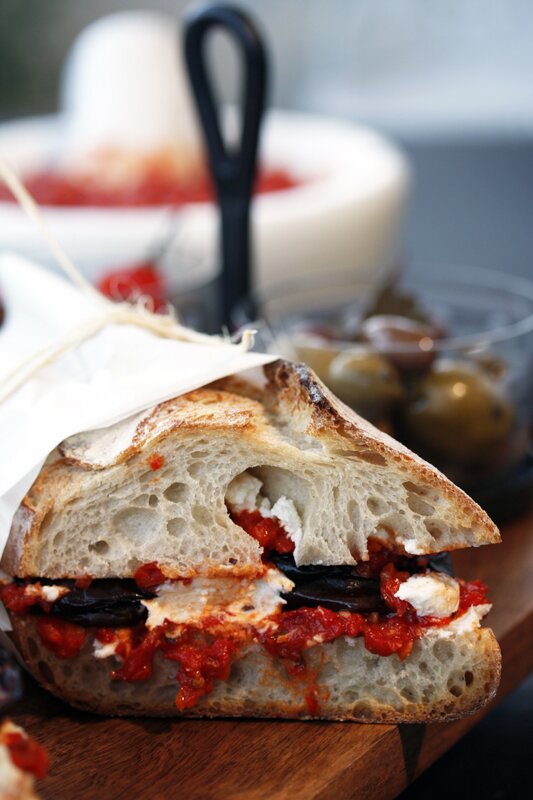
Hi guys, I’m back…for good this time. I hope…. I have to be honest with you…I was away because I had the blues…. There was nothing wrong with my life and still I felt pretty crappy. I don’t want to complain or put sad violin songs in the background. It was something physical, hormonal… yes being a woman has its downfalls…it’s not always fabulousness. But Now I took care of it and hopefully I’ll be okay. So I got my groove back and things are shiny again. I missed all of you a lot…really…A LOT. Some of you were really a darling and made me feel so good, I am really thankful for all of you. That’s the best part of blogging really. To meet those great women out there. Now let’s talk a bit about food, Oh…. I missed that…to blab endlessly about food. My hubby love harissa, he wants to spread harissa in almost everything. I only discover the goodness in using it because of him. But now I can’t be without it. And it’s not that easy to find. Usually you find Harissa paste, so I decide to take control and do my own. And wow…. what a difference, in this recipe the Harissa is chunky, garlicky, spicy it’s delicious. So flavorful I could eat it alone. You have to try it, trust me on that. The Sandwich was so amazing I was speechless. My head was spinning thinking of all the sandwich possibilities I could do with it, artichoke, chicken and if you don’t like goat cheese you can use ricotta or cream cheese, some mild cheese to balance the heat.

Homemade Harissa

  • 10 fresh red finger length chilies
  • 3 red bell peppers roasted
  • 1½ tsp coriander seeds
  • ½ tsp cumin seeds
  • ½ tsp caraway seeds
  • 5 to 6 garlic cloves minced
  • ½ tsp flaked sea salt
  • 2 tsp tomato puree
  • 2½ tsp lemon juice
  • 1 tbsp light olive oil

Direction:

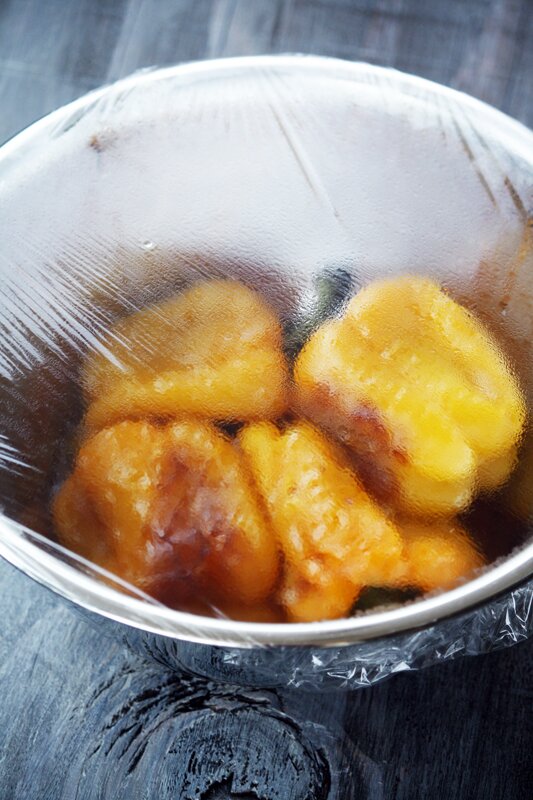
Place a fry pan over a medium heat. Char the chilies; turning them every few minutes until blackened all over (about 10 min). When it’s done transfer the chilies to a medium bowl and cover with film plastic to create steam, allow the chilies to sit for 5 to 10 minutes. The charred skin will loosen as the chilies cool. In a small fry pan, gently toast the coriander, cumin and caraway seeds for about 2 minutes, until fragrant. Peel away the skins from the chilies take half of the seeds off and Coarsely chop. Grind the seeds with a pestle and mortar to a fine powder. In another pestle and mortar pound the chilies, garlic, seeds and sea salt, making a fine paste. In the food processor pulse the roasted peppers, tomato puree, olive oil and the lemon juice. Now mix this with the chilies paste and allow the flavors to combine for at least one hour before use.

Eggplant and Harissa Sandwich

  • Crusty bread (Ciabatta or focaccia)
  • Goat cheese
  • Grilled eggplant

Directions:

Cut the eggplant in 1 inch Slices, put then in a big bowl filled with salt and water for few minutes. Then drain the water and pat dry the eggplant. Brush the slices with olive oil and grill it until soft. Set aside to cool down a little. Put the bread in the oven getting it to crisp a bit. Spread the goat cheese on bread then spreads the Harissa arrange the eggplants on top of it and enjoy. Serve it with some mixed olives.

{ 32 comments }

Watercress & Couscous Salad

by Anna on November 16, 2010

in Salads,Vegetarian

Hi guys, I’m going through a hiatus period with my blog lately, lots going on in my life. Some of it great some not so great. But it has affected my site. And I feel very upset about that. Hopefully I will have more time now, and will be able to go back to it. This salad I made is one of my favorites, I love to use couscous in salads. Because you can mix a bit of this and a bit of that and the results are always yummy. I was really happy when I found watercress at the market today, I don’t know why but you never see watercress around and I looooooooove it. It’s peppery and crunchy just delicious, and so good for you.

Watercress & Couscous Salad

Ingredients:

  • 1 box of Near East plain couscous
  • 1 cup of shelled edamame
  • 1 medium fennel bulb
  • 1 cup of mint leaves
  • 1 small bunch of watercress
  • Feta cheese cut in cubes
  • 2 cloves of garlic minced
  • Olive oil
  • 1 Lemon
  • Salt and Pepper

Directions:

Cook the couscous following the box directions, set aside to cool down. Slice the fennel with a mandolin. Add the sliced fennel, the edamame, the watercress, mint leaves and the feta cheese. Mix together a simple vinaigrette with the olive oil, lemon juice, garlic, salt and pepper. Pour it in the salad and mix it carefully so you don’t break the feta cheese. Enjoy.

{ 27 comments }

Purple Basil Lentil Salad

by Anna on November 2, 2010

in Salads,Technique,Vegetarian

I’ve been bitten by the DIY bug; lately I’m experimenting like a mad scientist. And I’m having so much fun; you can do it yourself almost everything. I use roasted pepper all the time, in sandwiches, salads, so I decided to roast my own, and what a pleasant surprise…it taste better that the ones you buy in jars. And it was so easy to prepare.

Now in a not so cheerful note I just started a new diet. Yeeees Since the last chocolate cake I had seem to have failed to understand that it had to leave my belly for good after I ate it. The thing decided to mount camp in my hips. So I have to tell it that we are going to take separated ways.

– I’m sorry to break this news to you chockie; I will definitely miss your velvety deliciousness. But you know… it’s not you, it’s me. Lol

The word diet seems to give everybody goose bumps, it’s like you have to take all the fun out of your life, right? But really…it doesn’t need to be that way. You just need to get creative and make the diet food looks fabulous.

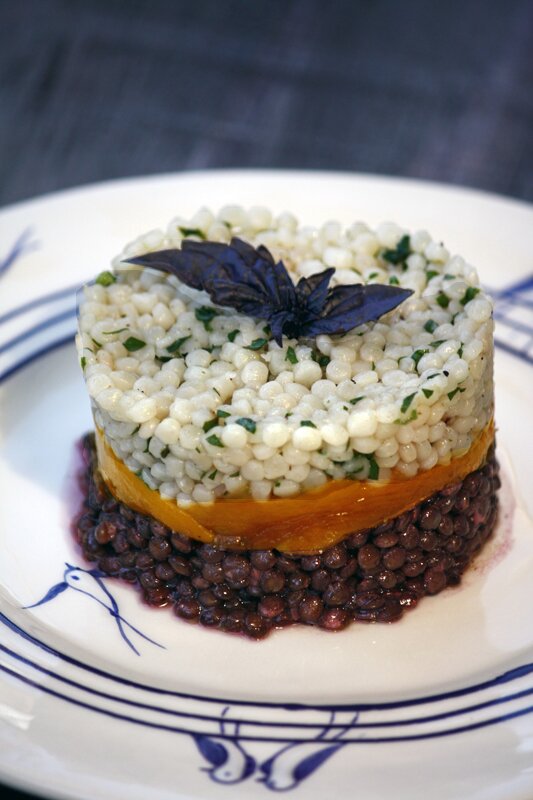
Purple Basil Lentil Salad

For the lentils:

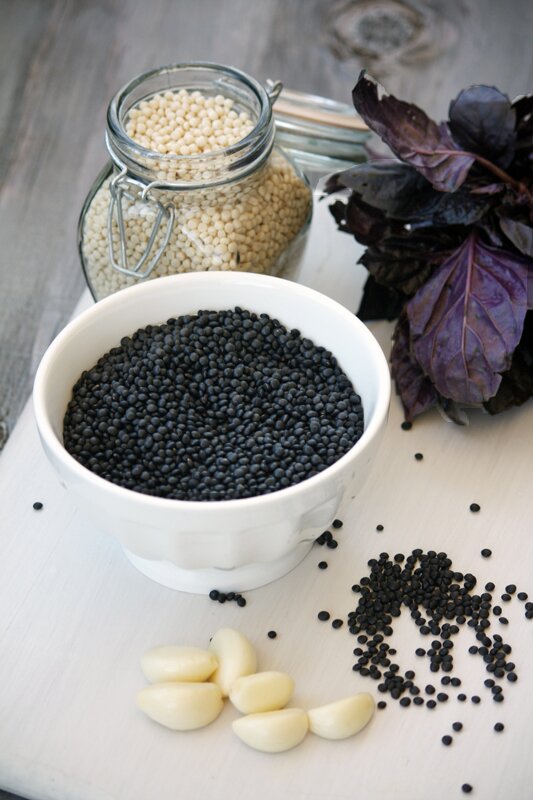
  • 1 cup black beluga lentils
  • Cook the lentils with 2 cups of water, no need to soak the lentils. Cook until tender. Drain it and reserve.

For The Purple basil Pesto

Ingredients:

  • 2 cups packed fresh purple basil leaves
  • 2 cloves of garlic
  • 1/4-cup pine nuts
  • 2/3 cup extra-virgin olive oil, divided
  • And salt and freshly ground black pepper, to taste
  • 1/2 cup freshly grated Parmesan cheese

Directions:

Combine the basil, garlic, and pine nuts in a blender and pulse until coarsely chopped. Add 1/2 cup of the oil and process until fully incorporated and smooth. Season with salt and pepper. If using immediately, add all the remaining oil and pulse until smooth. Transfer the to a large serving bowl and mix in the cheese.

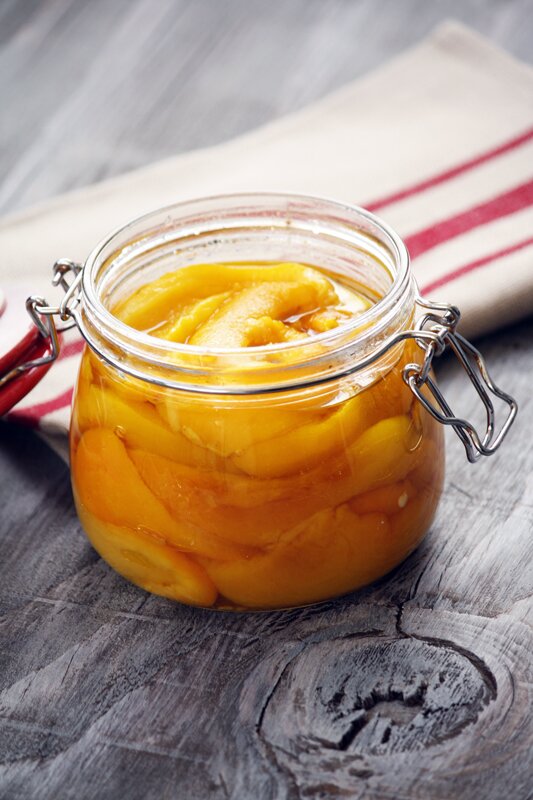
For the roasted yellow Pepper:

Spread olive oil all over the peppers. Place the oven rack in the middle position and preheat the oven to 450 degrees F. arrange the oiled peppers on a sheet, and place onto the oven rack. Roast for 30 to 40 minutes, turning occasionally with metal tongs, until the skin is charred and blackened.
Remove the baking sheet from the oven, and carefully transfer the peppers to a medium bowl and cover with film plastic to create steam allow the peppers to sit for 5 to 10 minutes. The charred skin will loosen as the peppers cool.
Remove the roasted peppers and place them onto a clean cutting board. Use a paring knife to remove the charred skins, stems, and any seeds from the peppers. Slice into ¼-inch pieces and use in recipes, or store in an airtight container in the refrigerator for up to one week until ready to use.

For the Israeli Couscous:

  • 1 cup Israeli couscous
  • 1 small shallot or onion chopped
  • 1garlic clove minced
  • 2 Teaspoons olive oil
  • 1 1/2 cups of water or chicken stock
  • 2 Teaspoons chopped parsley
  • Salt and pepper to taste

Directions:

In a sauté pan add the olive oil, onion, and garlic and cook until translucid. Then add the Israeli couscous and let it brown a little. Add 1 1/2 cups of water or chicken stock and let it simmer. Finish with the parsley and reserve. Mix in a bowl the lentils and the pesto sauce. Then fill a presentation ring with a bit of the lentils, add the roasted peppers and then add the Israeli couscous. You could serve it with some baby arugula on the side. I was out of arugula yesterday. Enjoy.

{ 21 comments }

Roasted Butternut Squash Soup

by Anna on October 29, 2010

in Soups,Technique

_

Hi guys, I know I have been a bad, bad, blogger lately, sorry about that. But I really needed this time off to prepare my house for my supper duper end of the year. So there was loads of cleaning and organizing around here. Changing my summer outfits with fall and winter. You know…. dry-cleaning my winter stuff so they are all nice and snugly. Not that I will have much of a winter here at sunny California but still. Nice and snugly is a must for me.

I like to have a “spring cleaning” in every change of seasons, that way I never have an absurd amount of mess around me. My props though are becoming a big, huge situation here. I’m crazy about them, but they are getting a bit out of control. Well… what can I do? When I see beautiful little bowls or plates I can’t resist them. This week I organized all my kitchen utensils in pretty pitchers. It’s easier to use if they are not tucked inside drawers. And I think it looks darn cute. Non?

Even my fridge was completely reorganized, so…. what I thought would take only 3 days actually took almost 3 weeks. But now I’m done and I can start fresh.  It’s really impossible to ignore all the pumpkin around; it’s a pumpkin invasion. Everywhere you look there is a pile of pumpkins. So almost in a trance like state, I bought some too, and last night I was in the mood for some nice soup and it was also a chance to use my new yummy homemade chicken broth. You should definitely try to make your own. It’s totally worth the extra work.

Roasted pumpkin Soup

  • 2 medium butternut squash
  • 8 garlic cloves
  • 4 sage leaves
  • Olive oil
  • Salt and pepper
  • Red pepper flakes
  • 2 cups of homemade chicken stock

Directions:

Pre-heat the oven to 350F. Peel the squash cut in half and clean up the seeds, then drizzle it with olive oil, add the garlic and the sage leaves. Season with salt, pepper and red pepper flakes, and roast for 30 minutes or until tender. When it’s done transfer to a soup pot and add the homemade chicken stock. Let it simmer for 8 minutes then with a hand immersion blender puree it. I garnished mine with bacon that I also roasted in the oven for 5 to 7 minutes or till crispy.

Roasted chicken Stock

  • 2 1/2 pounds chicken bones
  • 1/4-cup olive oil
  • 2 red onions, sliced
  • 1 stalk celery
  • 2 stalks leeks
  • 2 carrots, diced
  • 2 teaspoons chopped fresh thyme leaves
  • 8 cups water, or as needed
  • 1 head garlic, halved
  • 4 teaspoons kosher salt
  • 1 tablespoon cracked black peppercorns

Directions:

Preheat the oven to 450 degrees F Arrange the chicken bones on a big ovenproof pot. Add the olive oil, onions, celery, leeks and carrots, garlic; roast everything for about 45 minutes, or until well browned. When it’s done fill the pot with enough water to cover the bones by 2 inches. Bring to a boil, and add the thyme, salt, and pepper. Reduce heat to low, and simmer uncovered for 2 hours. Add more water if needed. Strain out all of the solids from the broth, drain off the fat, and refrigerate. You can also remove the fat after it has chilled. The stock will be thick. I like to use freezer bags for longer storage.

{ 24 comments }

Dark Chicken Stock

by Anna on October 20, 2010

in Chicken,Soups,Technique

I’m pretty sure you guys have already seen the cool Rouxbe online cooking school. If not Rouxbe is the world’s first-ever online cooking school. I’m always trying to learn more and more and I found that their videos are a great help for me. So now I just became a Rouxbe Cooking School affiliate partner.

I partnered with Rouxbe to help improve my cooking skills and yours. As part of their affiliate program, I have the power to give you a free, full-access, no-videos-barred, 14-day pass to their site. All you have to do is go to the Rouxbe Online Cooking School and redeem the 14-day Gift Membership. After the trial, you can join for as little as $15 per month; however, there is no obligation. It’s awesome! Check it out.

With the weather finally getting a bit chilly I started craving soups. And I think a soup made with homemade chicken broth is delicious. And you can use the chicken broth for many other dishes, like risottos, or couscous. I loved this recipe, because the chicken and the vegetables are roasted which accentuate all the flavors.

Here is a example of  the lessons, they are very high quality videos. And easy to learn.

{ 12 comments }

Trying to Bribe you with sugar.

by Anna on October 12, 2010

in Dessert,Life

Peach Tart Tatin

Yes I am trying to bribe you to vote for me. lol… is it working? Click here for the recipe. And here for voting. And  a big thanks to all lovelies that already did.

{ 12 comments }

← Previous Entries

Next Entries →